Wednesday, June 22, 2011

Sub Project: Circle Jig Test

I got a chance to test out the circle jig, and make sure I made any mistakes on my scrap pieces before going at the good ones. Above you can see that I modified the jig a little bit as a result of the test. I added a couple more holes to allow sawdust to flow through, and I widened the hole for the router bit so the collet could fit all the way through. Before, the bit wouldn't go deep enough to cut all the way through the 3/4" plywood.

I learned a couple other valuable lessons in the process: the first being that I shouldn't try to use the drill to back out the pivot screw. It just snapped off flush with the surface and I never managed to get it back out. I ended up just putting in another screw, which slightly shifted the circle.

I also learned that I should be careful about drilling the hole to allow the router bit to pass through. I drilled right where the edge should have been, and ended up with a little bump in the hole (seen in the bottom right in the image above). In spite of those mishaps, it turned out really well.

The hole measured exactly 13-7/8" in diameter, and it fits like a glove as the cutout for the subwoofer. Next up I need to trim a few pieces then cut the actual cutouts in the baffles before I can start gluing things together.

Sunday, June 19, 2011

Sub Project: Router Circle Jig


In preparation for making the cutouts in the baffles, I got to work making a circle jig for my router. I went to several hardware stores and none of them seemed to have what I was looking for, so I just got a cheap 1/4" piece of MDF (conveniently the same thickness as the base plate for my router) and had them cut it into strips that I could use for my own circle jig. First I marked the holes for the screws that held the stock base plate onto the router.

Next I took the project outdoors where I drilled holes large enough for the base plate screws to go through. I also drilled a big 1/2" hole in the center to let the router bit pass through.

After a couple minutes I had my holes and was ready to mount it to the router, or so I thought. I had forgotten that the screws were beveled, so I had to go back and countersink the screw holes so that they would sit flush with the bottom of the jig to keep it from scratching the baffle when I cut the circle.

As you can see from the following picture, I messed up one of the first holes when I tried to countersink it, and it ended up going all the way through. I just shifted the base plate, redrew the template and started over. It ended up working great. Now all I need to do to finish this off is measure from the far edge of the router bit to the point where I want to pivot and I'll be good to go to start making some perfect circles.


Saturday, June 18, 2011

Sub Project: Sometimes you just need a little help from Dad

I made it home today, and with help from my Dad I managed to get all the cutting done for the subwoofers. I bit the bullet and bought a nice cutting guide that proved to be invaluable. Because of it, the cutting ended up going very well, and I even managed to salvage my original design. Funnily enough, there was an entire sheet left over. I'll have to think of something to do with it.

After all the cutting was done, there was quite a mess of sawdust. Below, you can see that everything turned out pretty well. There was just enough wood in the five sheets I used to get all the panels I needed.

Next, I made my way over to the hardware store and started stocking up for the tasks to come. Left on the agenda is routing the cutouts for the drivers, and gluing everything together.

The back of my car looks like a roving hardware store, and there are still a couple more things I need to pick up to be totally ready to finish this project up. It won't be too much longer, though.


Wednesday, June 15, 2011

Sub Project: Planning


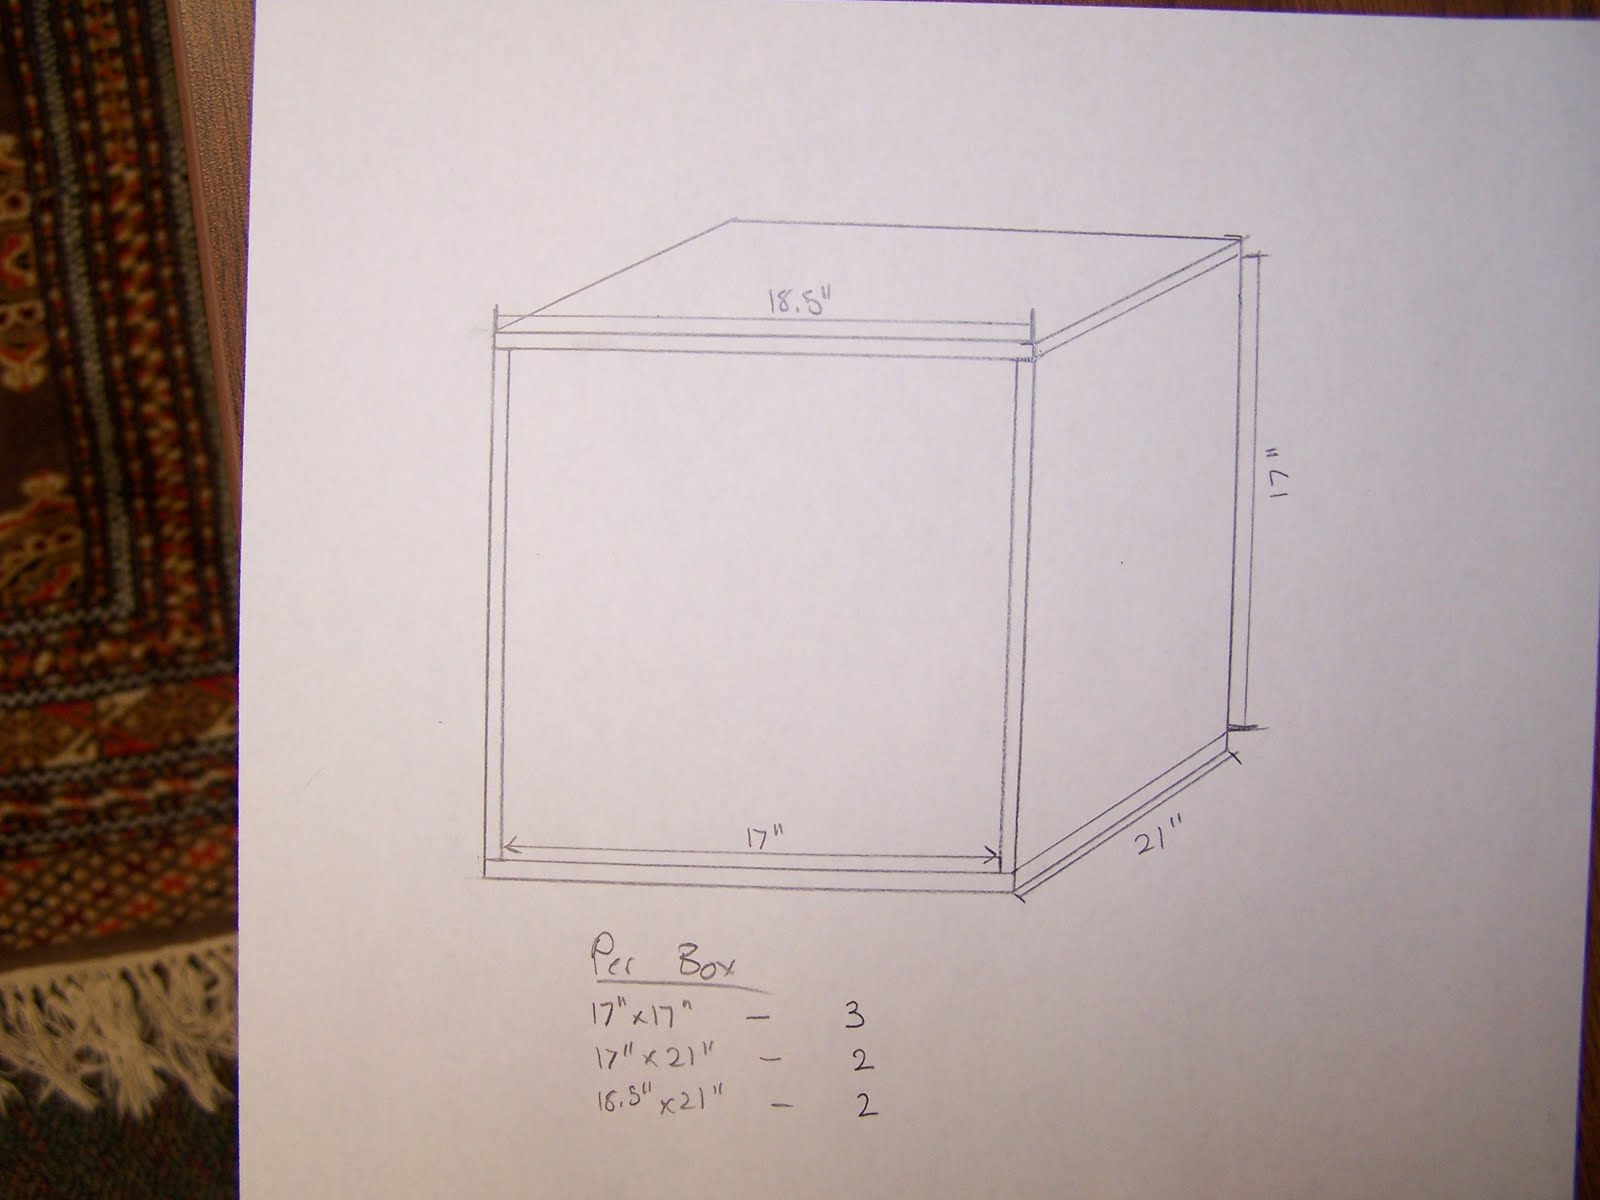
After screwing up the plywood, I'm determined not to make any more major mistakes with this project. To do that, I'm taking some time to more thoroughly plan out each step, starting with the new cabinet design. I've changed the plan so that the double baffle is now entirely inside the opening from the sides and top and bottom. Overall, however, the enclosure is about the same as it would have been. I drew a quick sketch with the dimensions to help myself out when I made the cut list.

Next I plugged in the sizes of the pieces that I have, and the pieces that I want cut into a program called Cutlist (aptly named), which goes through the possible solutions to find the one that reduces waste.


Next on the agenda is to find a way to make straight cuts without a straight edge on the pieces that I have.

Tuesday, June 14, 2011

Sub Project: How not to cut plywood


I got started cutting my plywood today, and all was going well (or so I thought). I was using a small board with what I had assumed was a straight edge as a guide for the circular saw. This seemed to work out alright, and I thought I was getting some pretty good cuts until I decided to measure the width from the middle of the freshly cut board as opposed to the ends. It turns out that the guide board was flexing in the middle, and the center of the cut boards was considerably shorter than at the ends (up to 1/4"... ugh). Thankfully I noticed before I cut all the wood, but now I've got several sheets that are going to be tough to get back into a usable condition, and I'll probably have to modify my design a bit to work with what I've got.

I'm going to take a few days off and start again on the weekend when I don't have to worry about time constraints. That should also give me some time to more thoroughly work through the design of the cabinets, and what I'll need to do. In my excitement, I got a little impatient, and that's probably what led to the oversight with the cutting. C'est la vie...

And for those of you would-be carpenters out there-- remember: "Measure twice, cut once" is only part of the story.

Saturday, June 11, 2011

Lepai Amp Impressions


After a long wait while Parts Express got some more in stock, I've got a new Lepai amplifier using the Tripath TA2020 chip to power my Overnight Sensations. It's a welcome addition because for the past month, they've been sitting around looking nice, but not much else. So far, the amp has served its purpose well. The main reason I got it was to take the place of an old Sony AVR that I had previously been using to power the speakers. It worked fine, but the Sony AVR was huge, and took up way too much space on my desk. The Lepai amp takes up almost no space, and it pumps out way more than enough power for the speakers. It's also nice to know that I've got some portable power in the event that the speakers go on the road for whatever reason. My only gripe so far (and it's a minor one) is that there's a small thump whenever I power down the amp, but it hasn't damaged anything so far, and I don't think it will. All around, it was a solid purchase for about $20.

Sub Project: Plywood is In!


I finally got some Baltic Birch plywood for my sub project. The lumberyard where I got the plywood didn't have a panel saw, so for a while, transportation was problematic since the 5'x5' sheets won't fit in my car. I eventually managed to borrow a circular saw, so I could cut the wood at the lumberyard to fit in the car.

This stuff is pretty great. It feels extremely sturdy, but isn't ridiculously heavy like similarly sized MDF would be. The only downside is that apparently it won't take stain well. I'll have to play around with some scraps to see what I can do, but finishing is pretty far off, so there's plenty of time.