Wednesday, December 7, 2011

New Finish on Overnight Sensations


It's been a while since I last posted, but here's a small update on my Overnight Sensations project. After a while of looking at these guys sitting on my desk, I decided that the finish was beginning to look pretty flat, and once the Danish oil had completely cured, the wood ended up with an almost sickly dry look to it. I had great success with the Wipe-on-Poly I used with my MFW-15 subs, so I got some more to bring some new life to my bookshelf speakers. I opted for the satin finish since I didn't want the speakers to jump out too much, and it ended up being the right way to go. There's just enough sheen to add depth and give the wood that "wet" look, but without blinding you. I'm very happy with the result.

You can see some of the original finish in my build log here: Overnight Sensations Build Log.

Monday, August 22, 2011

Pioneer VSX 1020-K


I finally took the plunge and got myself a new receiver to take advantage of the HD audio formats on Bluray. After weeks of agonizing over which receiver to get, I finally landed on the Pioneer VSX-1020-K mostly based on price. Being last year's model, it was a steal, and still had all the features I wanted (and then some).

My main requirement was just that the receiver had HDMI connectivity, since I wanted to see what I was missing with the lossless audio tracks on Bluray. Since almost every receiver made recently has HDMI connectivity, that did little to narrow down the field. After HDMI, I wanted two zone support so I could power my desktop speakers from the same receiver, and finally I wanted a receiver with some room correction software to play around with. After lots of comparisons, I ended up with the 1020-K since it was the least expensive of the models I was contemplating.

Aside from the features I was looking for, this receiver includes networking functions and internet radio which I'm looking forward to messing around with in the future. For now, what's been taking up much of my time is fiddling with the Advanced MCACC room correction software that comes installed on the 1020-K. The receiver comes packaged with a small calibration microphone that it uses to adjust channel levels, time delay, equalization, and standing wave compensation.

My first impressions of the settings made by MCACC are favorable. It set all the channel levels and distances spot on. The EQ is a more subtle effect-- nothing like the night and day differences I read about everywhere, but I think it improved the clarity of the sound, and overall I'm very pleased. Now I just need to figure out how to interpret the reverberation graphs it generates so I can properly set the time capture, and hopefully improve the room correction.

Overall my experience with the Pioneer VSX 1020-K has been very good, aside from some shipping shenanigans (not a fault of the receiver itself).

Thursday, July 28, 2011

Sub Project: Lookin' Good

At last! Here they are in all their glory. They turned out much better than I could have hoped, and I just can't stop looking at them. I'll shut up now so you can enjoy the speaker porn.


I did take some quick measurements comparing these with my old subwoofer. I'm beginning to think there's some pretty heavy room interaction causing that peak at 50 Hz since it affected both setups (one of the MFW-15's is in the same position as the H100 was). I didn't add any offset to these measurements, and I tried to match the levels as closely as possible, so you can see that I don't lose any output at all from the switch to sealed from ported (not too surprising since I added a second sub). I did gain a lot of extension, though, which is what I was after.

I hope everyone enjoyed watching this process as much as I enjoyed carrying it out. I'll keep you up to date on any new projects I come up with, but for now I'm taking a break.

Tuesday, July 26, 2011

Sub Project: Almost There...

I finally managed to get through the finishing process. I know I had originally planned to put about 8-9 layers of topcoat on these, but it turns out they look pretty good after just three (and a fourth light one on the top and front). While I had them disassembled for finishing, I did a couple other things that I neglected to do the first time around.

The first of which was just because I had planned to open them up again, and that was adding bracing from the top to the bottom. I don't think it was an issue when I had them hooked up earlier, but I had the wood, and there was no reason not to. These things were solid as a rock before, and now they're even more so.

Next was something that I decided not to do at first, but ended up wishing I had done, and that was soldering the internal wires to the connector. The crimp on terminals I used didn't fit very well, and I was afraid they would come loose eventually. Now I don't have to worry about that.

I'll put up some beauty shots when they're fully assembled, and then do some more measuring when they're back in the system. I'm going to take the opportunity to compare these to my BIC Acoustech H100 (a ported 12" woofer). I'll do the normal frequency response, and try to work through some THD measurements.

Monday, July 18, 2011

Sub Project: Stain Sneak Peek

Here's a crummy photo of the freshly stained subs. They look a little dull right now, but the color is right, and it'll really pop once it gets that "wet" look from the topcoat. It'll be a little while before they're up and running again, since I'm looking to put 8-9 coats of wipe on poly on these, and I'll only be able to do about one a day. In spite of my amateur staining, I think they should turn out nicely.

Just a note: they don't look as red (or as blurry) in person. I'll do a better job of capturing the color once they're finished.

Friday, July 15, 2011

Sub Project: Stain Test

Well, it looks like I'll be able to start finishing the subwoofers earlier than I anticipated due to the availability of a place to let them dry once I start wiping toxic vapor-producing chemicals on them. Before I go ahead and slap some stain on these guys, however, I've been doing a few tests to find a color I like. Above are the results. The middle one is a mix of the right and top colors. At the moment I'm leaning toward the middle, closely followed by the right. If you have any opinions, feel free to let me know. I'll keep everyone updated on the progress, so stay tuned.

Saturday, July 2, 2011

Sub Project: Finished (For Now)

Finally finished (for now).

It's been a while since my last update on the project, since I got on a roll, and just ended up finishing up for now. The first thing I did since last time was to make the holes for the Speakon connectors I'm using. Since the drill bit I was using wasn't quite big enough to make the right size hole for the connector, I had to improvise to get it to fit correctly. First I made a hole in some scrap MDF, and widened it using sandpaper until the connector fit.

Then I used the flush-trim bit for my router and the template hole to cut the perfect size hole for the connector in each cabinet.

These connectors are nice because all of the electrical connections are inside the housing, so there's very little risk of shorting, and they also have a nice locking feature so the plugs won't fall out.

Next I added some bracing across the sides. Eventually I'll be adding some top-bottom bracing, but that probably won't be until I do the wood finishing in a few months. It hardly needs it, but it couldn't hurt.

I don't have any pictures of gluing the top and bottom on, but it was much the same as before. After everything was glued together I used the flush-trim router bit to clean up all the edges before moving onto sanding. Above is a picture of the gasket tape I used around the lip that the driver sits in. It just creates an air-tight seal in the cabinet.

I added a couple screws to the connectors to keep them from moving around. Eventually I'll get some black screws and use some glue on the connectors, but that will wait until after the staining and finishing since I'll have to remove the connectors for that.

I used a roundover bit on the router to clean up the edges a little more. It made a huge difference in the look of the speakers, and it turned out pretty well.

Before finally closing them up, I got some cheap pillows and ripped them open to get some of the polyfill stuffing for the cabinets.

The polyfill increases the apparent internal volume, and should mask some of the mechanical noise from the drivers.

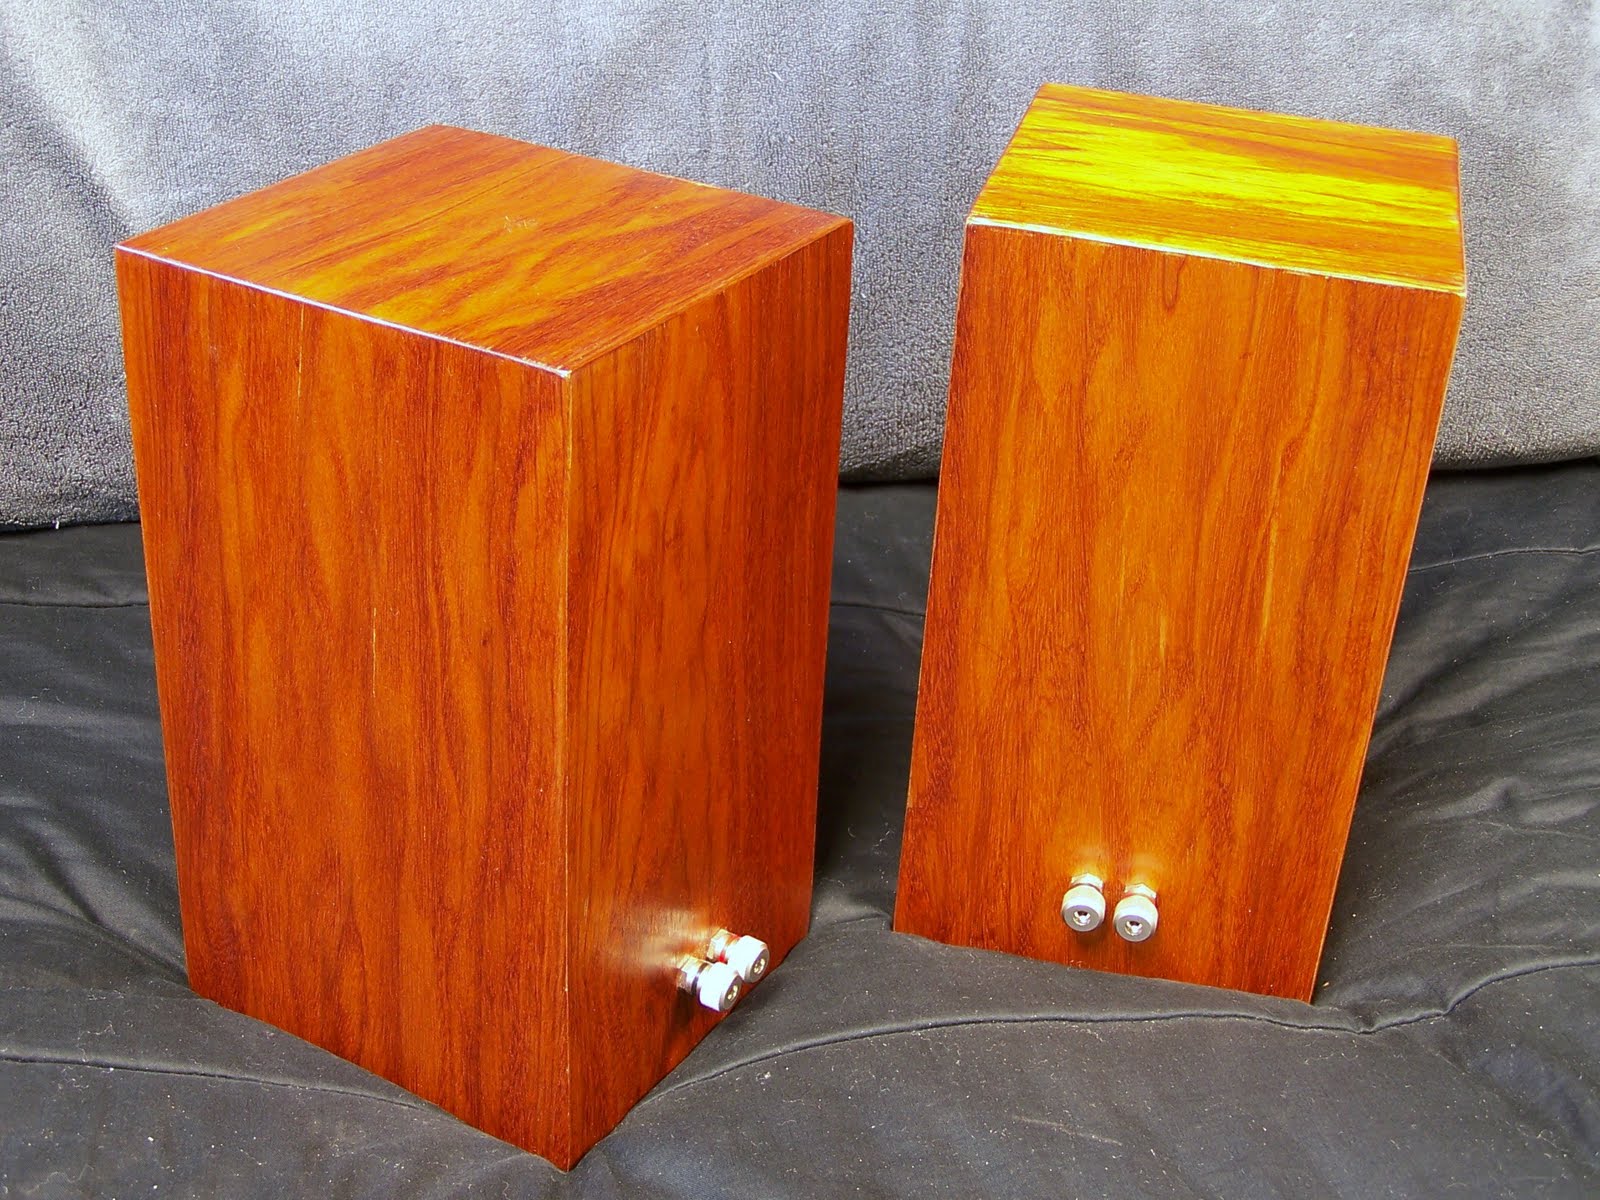
And finally above you can see the finished product. The old subwoofer is in the background, and you can see it's quite a bit smaller. It was tough fitting the new ones in their final places in the small room.

The final assembly wasn't without its challenges. I made the mistake of screwing in the driver before testing all the threads on the hurricane nuts, and it led to some issues. Some of the screws locked up in the nut and actually forced it out of its hole. With the driver in, there was no way for me to hold the nut still so I couldn't remove the screw and the driver was stuck. Eventually I just had to use a hacksaw to cut off the head of the screw and push it through the top so I could remove the driver and install some new hurricane nuts.

And for your viewing pleasure, here are the subwoofers in their natural habitat in my room.


I still need to stain and topcoat the subwoofers, but that can wait, since I don't have any way to safely let the stain dry.

That about wraps it up for now. I'll be posting some frequency response graphs of these monsters in the coming days, so keep a lookout.

Saturday, June 25, 2011

Sub Project: Gluing Has Commenced

I finished up a little bit of gluing this weekend. First I marked up the front baffle pieces. I marked the holes for the driver in the inner baffle, and inserted some hurricane nuts (seen further below). Next I marked on the outer baffle where I would position the inner baffle, and drilled some pilot holes for screws. I glued up the inner baffle, placed it on, and used the screws to clamp them together for drying. Next I glued the sides and back to the front baffle to get the start of the final enclosure. After this finishes drying, I'll put in the bracing, and attach the top and bottom pieces.

Despite all the work put into cutting the pieces as precisely as possible, things still didn't line up quite as well as I would have liked, so I'll probably hit a few places with some sandpaper or the router to even it out before I put on the final pieces.

Above you can see the hurricane nuts that will be for the screws holding in the driver. They have barbs that bite into the wood from the back so that when you screw in the driver they won't just fall out. I still added some glue just to make sure they don't end up widening the hole or dropping out over time.

I don't have any pictures of the gluing process because it was pretty messy (the glue has the consistency of snot, and gets everywhere), and hard enough to do without an extra pair of hands. I learned a couple things from gluing the first enclosure that made putting together the second one much easier. I marked the exact positions of all the panels so I could worry about keeping the parts together and not have to check every couple of seconds if everything is aligned, and I made sure that no glue got on the scrap pieces I was using to spread out the pressure from the clamps. On the first one, one of the scraps got stuck to the cabinet. Thankfully I was able to get it off without too much trouble, but it left some debris that will need to be sanded pretty heavily.

Thursday, June 23, 2011

Sub Project: A Baffling Experience

I spent today working on the dual baffles for the subwoofers by trimming away some excess for a better fit, and making the cutouts for the drivers. Above is a picture of the circle jig setup. I just measured from the edge of the router bit to a point on the jig equal to one radius of the hole I was cutting, and drilled a hole for the pivot screw.


Here's the first cut. I tried to do it a little too quickly by setting the router bit a little too deep at first, which made it tough going for the first pass. For the next cuts I made three passes instead of two and the router didn't sound as angry since it didn't have to chew through quite as much wood on each pass (this Baltic Birch is tough). The following picture was taken halfway through the first pass, which is about 1/4" deep.

After all of the cuts were made, I was left with a handsome set of double baffles. The inner baffle has a lip for the driver to sit in, and allows for holes to accept screws to hold the driver in. The outer baffle recesses the driver so it sits flush with the outside of the cabinet. Together they add some extra rigidity to the enclosure, so I won't be putting any back to front bracing.

And below you can see how the driver fits in. The holes came out really well, except for a small bump at the end of the final pass. Since the jig was attached to the part that was getting cut away, it didn't finish perfectly. Thankfully the bumps were pretty small, and a couple minutes with some sandpaper knocked them down flush for a perfect fit.


In the next couple of days I'll drill the holes for the driver screws and insert some hurricane nuts, then I'll glue the double baffles together, and finally start gluing the cabinet together.

Wednesday, June 22, 2011

Sub Project: Circle Jig Test

I got a chance to test out the circle jig, and make sure I made any mistakes on my scrap pieces before going at the good ones. Above you can see that I modified the jig a little bit as a result of the test. I added a couple more holes to allow sawdust to flow through, and I widened the hole for the router bit so the collet could fit all the way through. Before, the bit wouldn't go deep enough to cut all the way through the 3/4" plywood.

I learned a couple other valuable lessons in the process: the first being that I shouldn't try to use the drill to back out the pivot screw. It just snapped off flush with the surface and I never managed to get it back out. I ended up just putting in another screw, which slightly shifted the circle.

I also learned that I should be careful about drilling the hole to allow the router bit to pass through. I drilled right where the edge should have been, and ended up with a little bump in the hole (seen in the bottom right in the image above). In spite of those mishaps, it turned out really well.

The hole measured exactly 13-7/8" in diameter, and it fits like a glove as the cutout for the subwoofer. Next up I need to trim a few pieces then cut the actual cutouts in the baffles before I can start gluing things together.

Sunday, June 19, 2011

Sub Project: Router Circle Jig


In preparation for making the cutouts in the baffles, I got to work making a circle jig for my router. I went to several hardware stores and none of them seemed to have what I was looking for, so I just got a cheap 1/4" piece of MDF (conveniently the same thickness as the base plate for my router) and had them cut it into strips that I could use for my own circle jig. First I marked the holes for the screws that held the stock base plate onto the router.

Next I took the project outdoors where I drilled holes large enough for the base plate screws to go through. I also drilled a big 1/2" hole in the center to let the router bit pass through.

After a couple minutes I had my holes and was ready to mount it to the router, or so I thought. I had forgotten that the screws were beveled, so I had to go back and countersink the screw holes so that they would sit flush with the bottom of the jig to keep it from scratching the baffle when I cut the circle.

As you can see from the following picture, I messed up one of the first holes when I tried to countersink it, and it ended up going all the way through. I just shifted the base plate, redrew the template and started over. It ended up working great. Now all I need to do to finish this off is measure from the far edge of the router bit to the point where I want to pivot and I'll be good to go to start making some perfect circles.


Saturday, June 18, 2011

Sub Project: Sometimes you just need a little help from Dad

I made it home today, and with help from my Dad I managed to get all the cutting done for the subwoofers. I bit the bullet and bought a nice cutting guide that proved to be invaluable. Because of it, the cutting ended up going very well, and I even managed to salvage my original design. Funnily enough, there was an entire sheet left over. I'll have to think of something to do with it.

After all the cutting was done, there was quite a mess of sawdust. Below, you can see that everything turned out pretty well. There was just enough wood in the five sheets I used to get all the panels I needed.

Next, I made my way over to the hardware store and started stocking up for the tasks to come. Left on the agenda is routing the cutouts for the drivers, and gluing everything together.

The back of my car looks like a roving hardware store, and there are still a couple more things I need to pick up to be totally ready to finish this project up. It won't be too much longer, though.


Wednesday, June 15, 2011

Sub Project: Planning


After screwing up the plywood, I'm determined not to make any more major mistakes with this project. To do that, I'm taking some time to more thoroughly plan out each step, starting with the new cabinet design. I've changed the plan so that the double baffle is now entirely inside the opening from the sides and top and bottom. Overall, however, the enclosure is about the same as it would have been. I drew a quick sketch with the dimensions to help myself out when I made the cut list.

Next I plugged in the sizes of the pieces that I have, and the pieces that I want cut into a program called Cutlist (aptly named), which goes through the possible solutions to find the one that reduces waste.


Next on the agenda is to find a way to make straight cuts without a straight edge on the pieces that I have.